Integrations
LiveNX can optionally interact with external solutions to enrich its data and provide Alert messaging to external systems. Configuring the connections to these external systems is done via Integrations.

Cisco APIC-EM/DNA-C
LiveNX can connect to an external Cisco APIC-EM or DNA-C environment to:
• Discover Inventory
• Cross-launch to Client 360
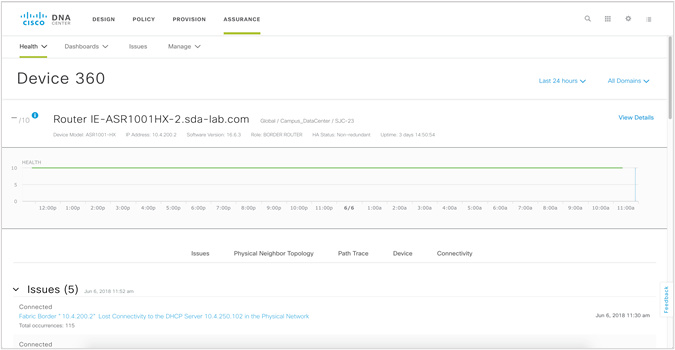
• Cross-launch to Device 360
• Health Score and Issues List
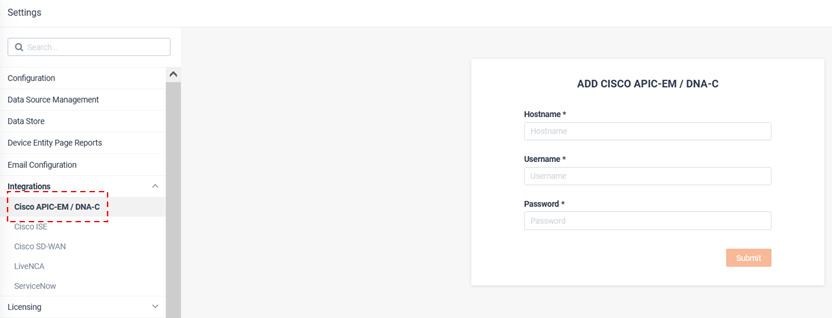
From the Cisco APIC-EM/ DNA-C tab, enter the Hostname, Username and Password and click .
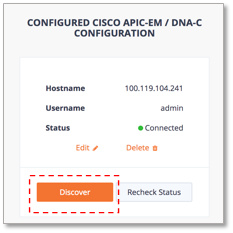
Once connected to APIC-EM/ DNA-C, the integration status will show as Connected.
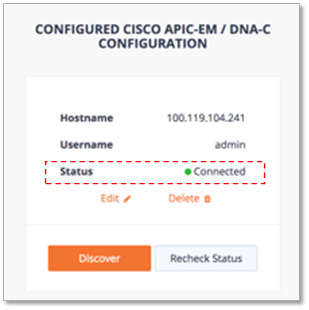
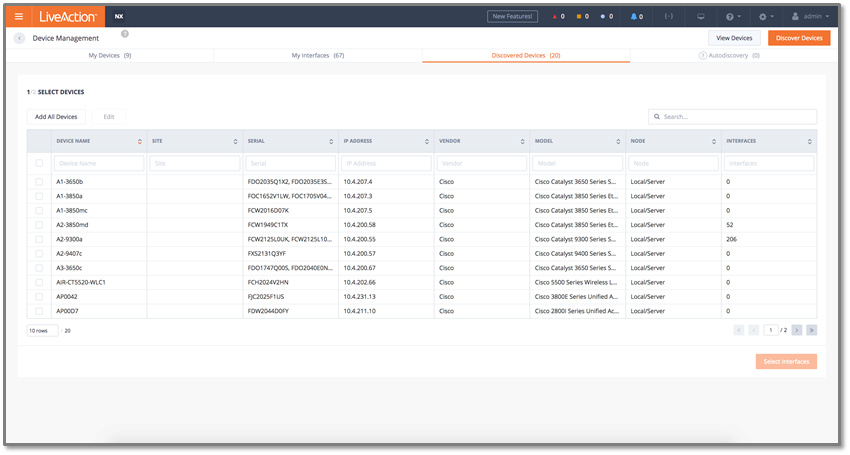
If desired, use the button for LiveNX to import APIC-EM/ DNA-C’s inventory for device discovery.
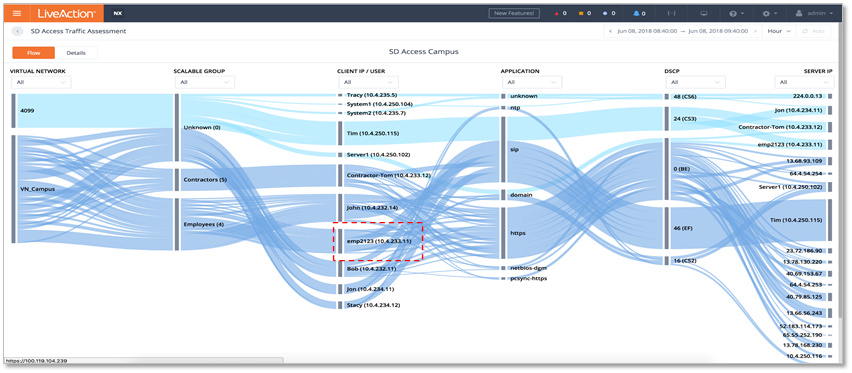
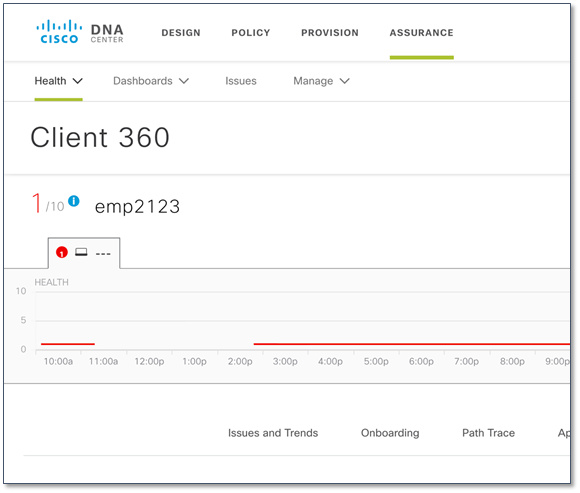
Once DNA-C is integrated with LiveNX, from the SD Access Traffic Assessment Story, click on a Client IP/ Username to cross-launch to DNA-C’s Client 360 view.
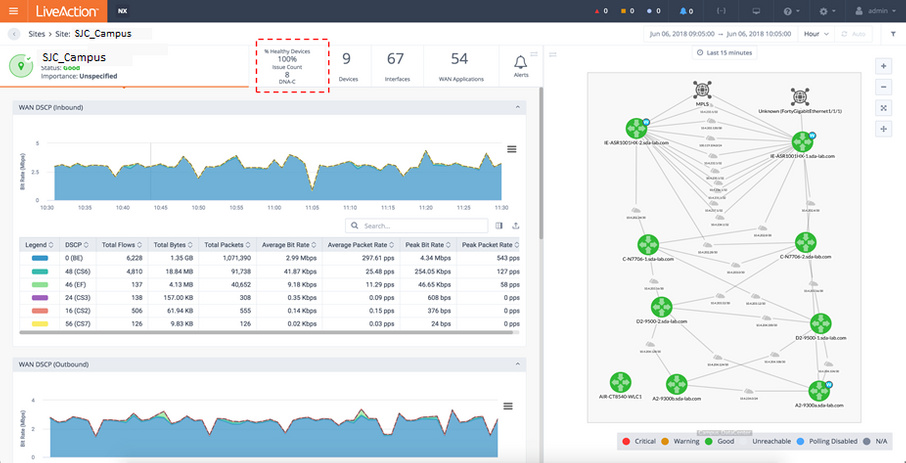
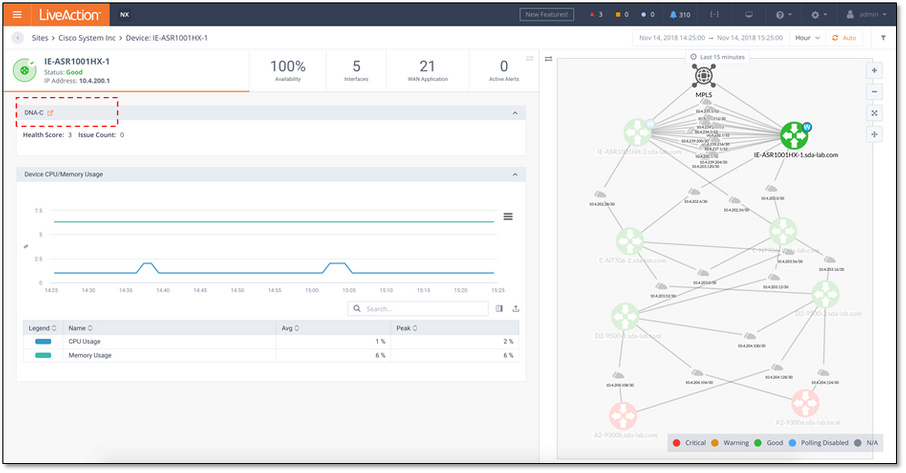
Once DNA-C is integrated with LiveNX, the Site view will include % healthy devices and issue count.
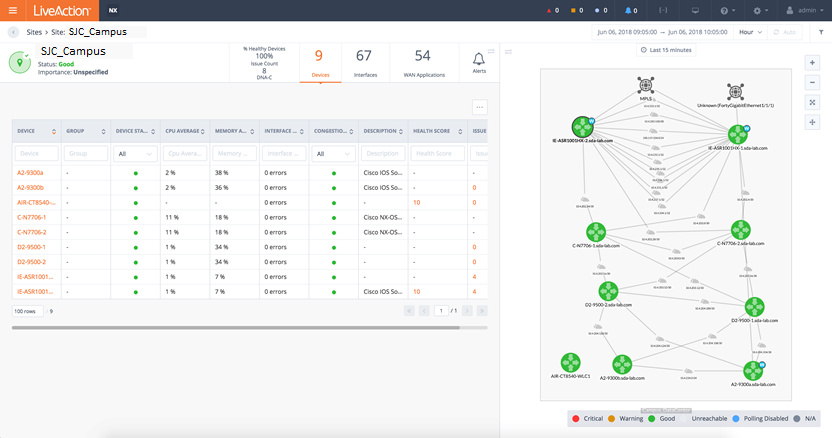
Additionally, the device summary view will include device health score and issue count.
Finally, the Device view includes the device health score and issue count. Click link to cross-launch to Device 360 view.
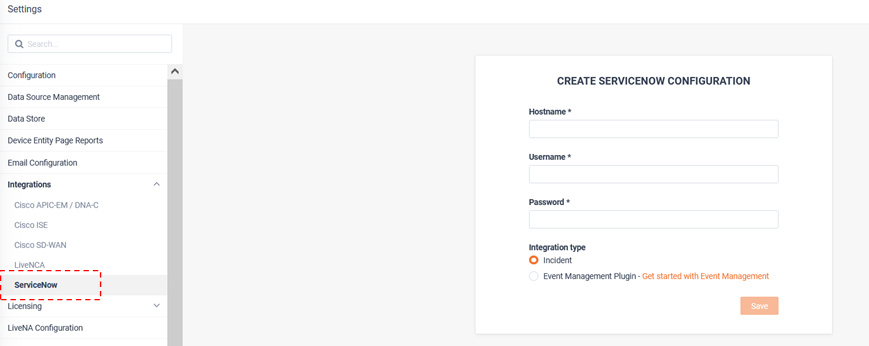
ServiceNow
LiveNX can integrate with ServiceNow for forwarding its Alerts as either Incidents or Events.
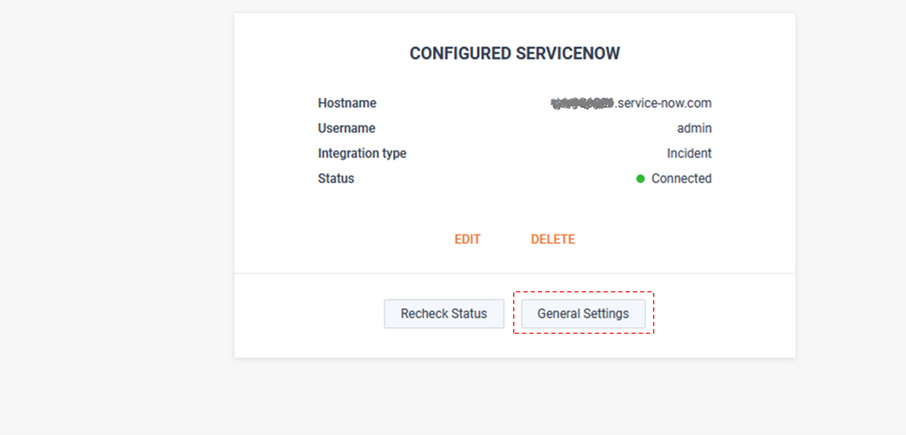
From the ServiceNow tab, enter the Hostname, Username, Password, and choose the Integration type.
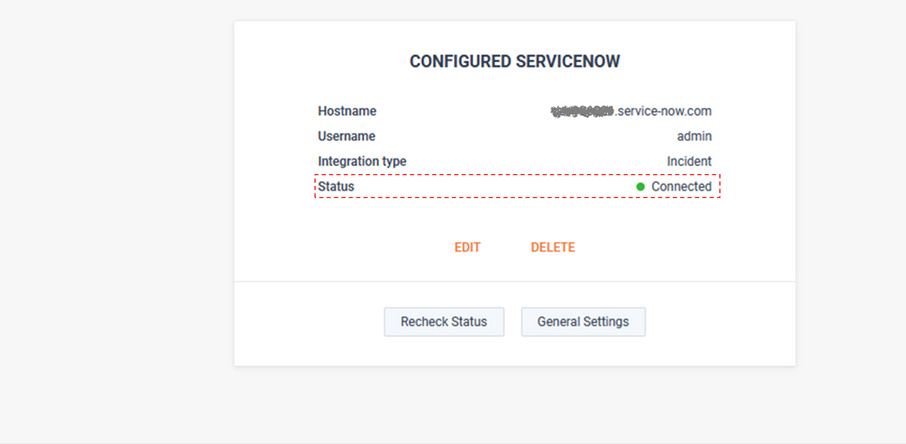
Once connected, the Status will show as Connected.
Each ServiceNow implementation can be highly customized. To ensure LiveNX can deliver its alerts in the best possible format, many settings can be defined on either a global or per alert basis. Global ServiceNow settings will be applied to all alerts that are forwarded by LiveNX to ServiceNow. Per-alert settings only apply to the unique alert and will override any global settings. To customize the global implementation, click .
The LiveNX alert description can be forwarded to any free text field available in the ServiceNow implementation.
LiveNX will poll ServiceNow, learn the potential options, and provide a picker to choose the field that bests serves the implementation.
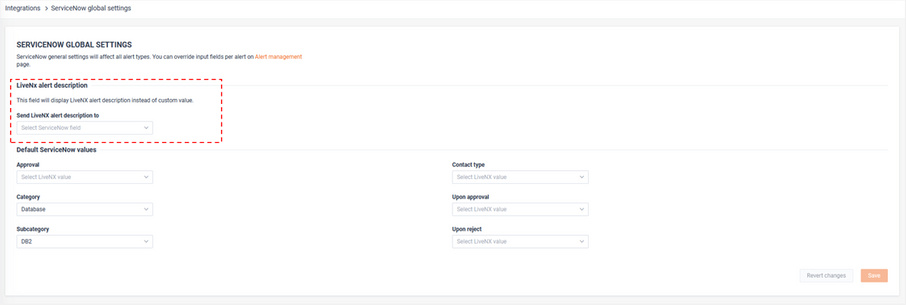
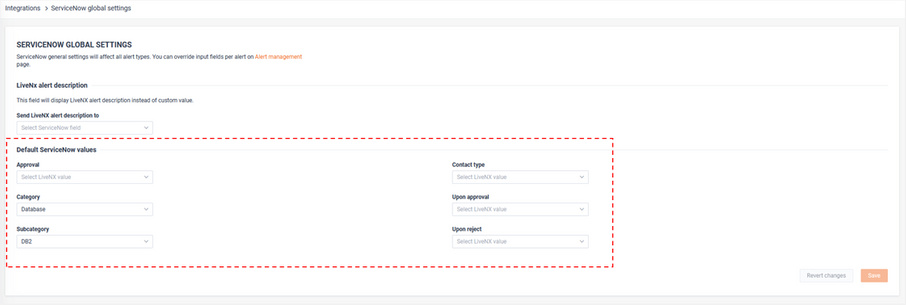
The Default ServiceNow values will provide a list of the available parameters that were discovered by LiveNX.
These selected value(s) will be applied to all LiveNX alerts, unless they are overridden by per-alert settings.
The screenshot below provides an example of the Default ServeNow values. These could be different in each network, so more or fewer options may be presented.
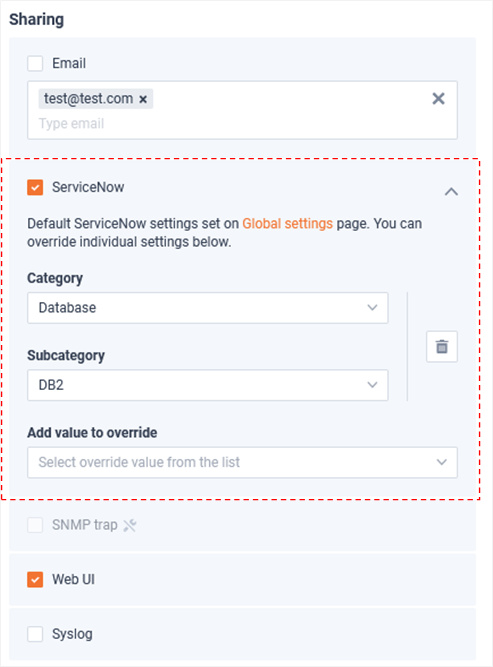
ServiceNow Per-alert settings can be adjusted withing each alert’s Sharing configuration.
LiveNCA
LiveNX can provide cross-launch capabilities to LiveNCA. LiveNCA is a partner product that provides comprehensive network configuration and change management (NCCM), configuration backup, restore, and audit capability.
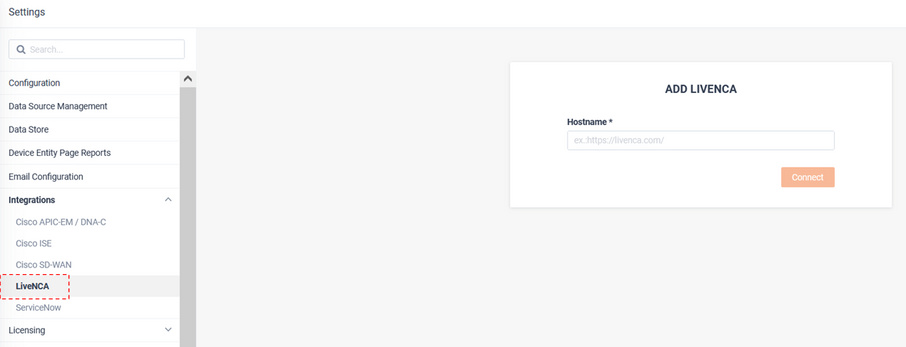
From the LiveNCA tab, provide the full URL to the LiveNCA server and click .
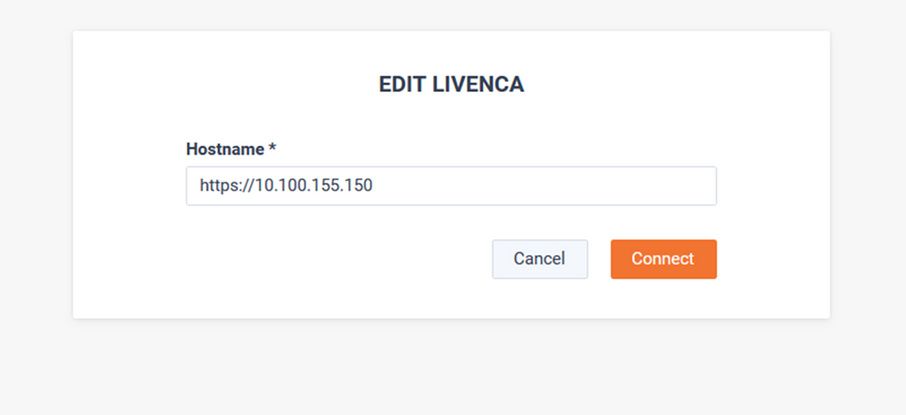
After a browser refresh, the button appears in the top left of the window.

Click to open the LiveNCA login page in a new browser tab.

Cisco ISE
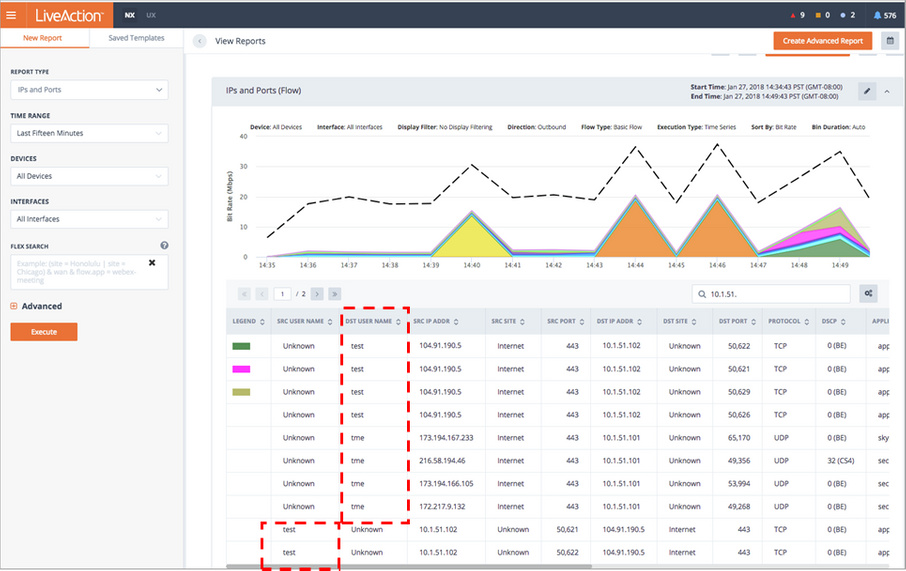
The Cisco ISE tab can be used to integrate LiveNX with Cisco ISE and PXGRID. This allows for identifying users in Flow reports based on IP address to username mapping.
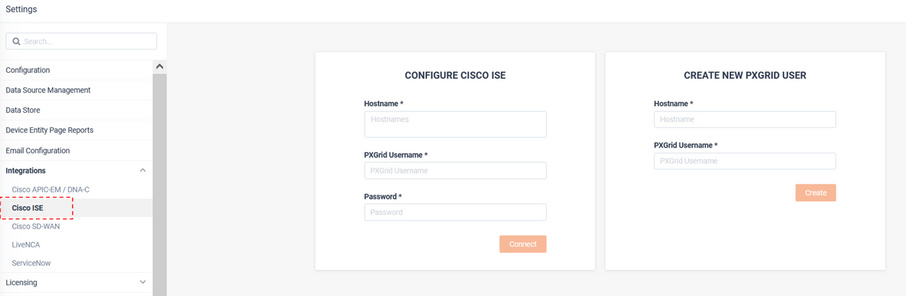
Cisco ISE and PXGRID must be configured to support this integration.
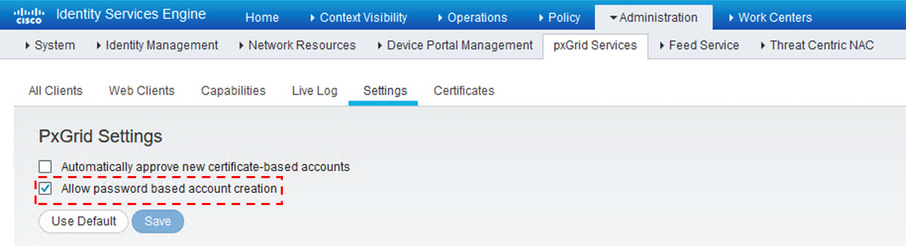
From Cisco Identity Service Engine Go to Administration > pxGrid Services > Settings and select Allow password based account creation, and then click .
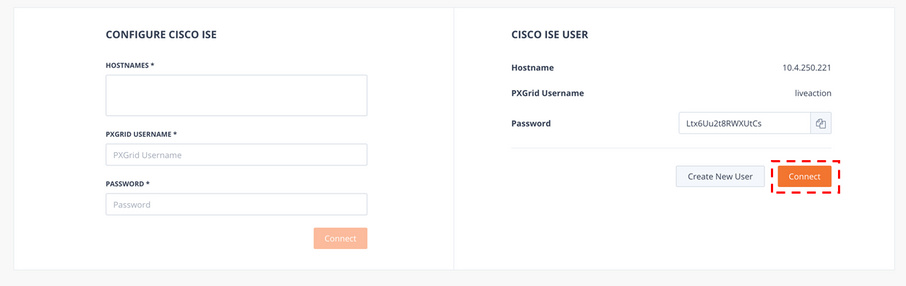
From the Cisco ISE tab, configure the ISE IP address or hostname and enter a pxGrid username. When finished, click (LiveNX will utilize pxGrid northbound API’s to create the new user account).
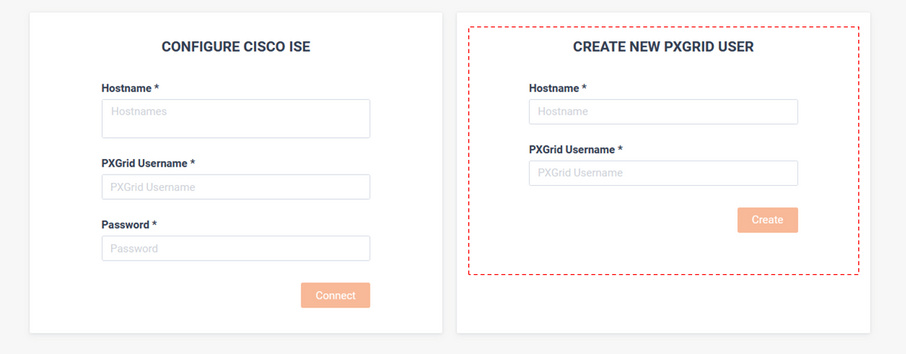
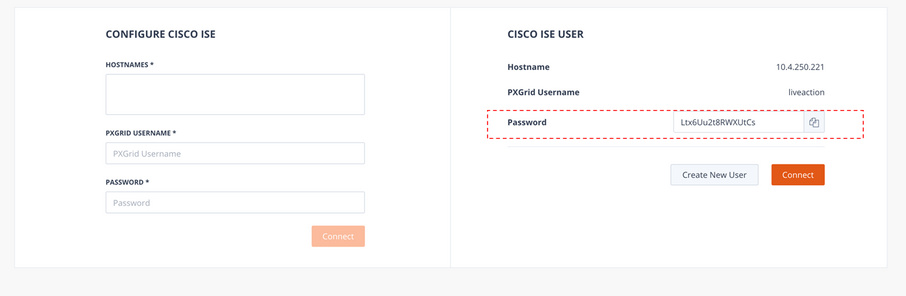
Once the ISE user is created successfully, the auto generated password is displayed.
• Required: Copy the password and save it for future use.
• Required: Do Not Click Connect
• The user must first be approved from the Cisco ISE admin portal.
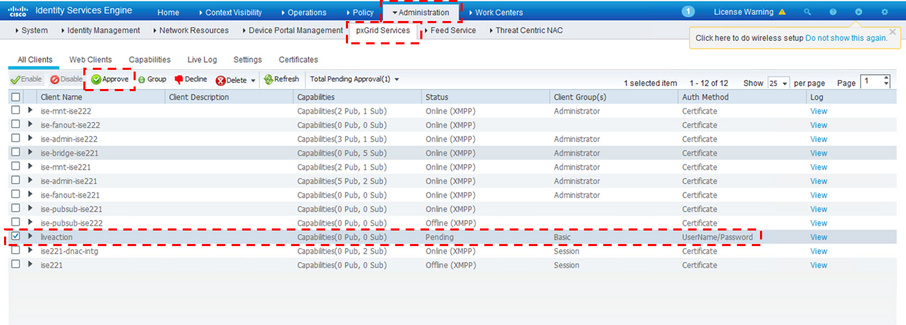
From Cisco ISE admin portal, navigate to Administration > pxGrid Services and select the newly created pxGrid user.
• Click to approve the user.
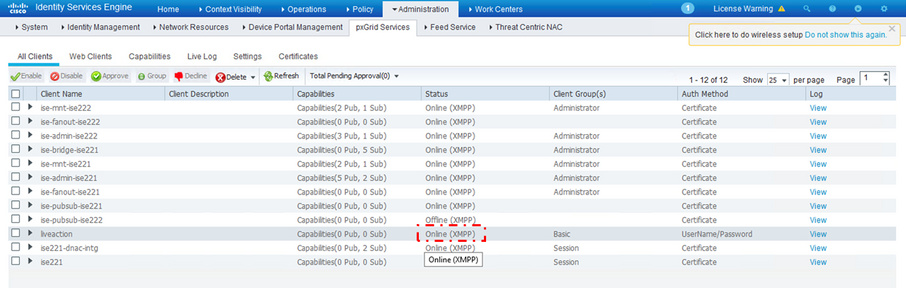
Validate the new user is Online.
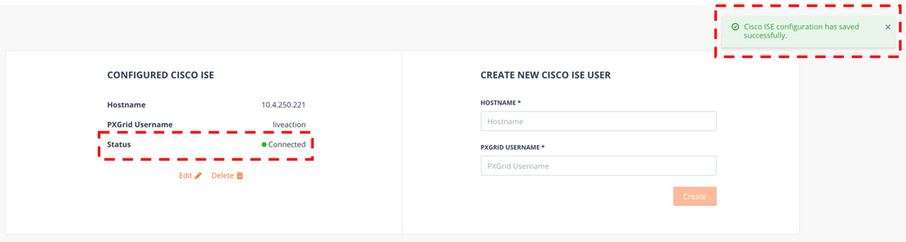
From the LiveNX Cisco ISE Integration page, click to connect the newly created user to the Cisco ISE host.
The Cisco ISE status displays as Connected.
Usernames learned from ISE will now appear in LiveNX reports.
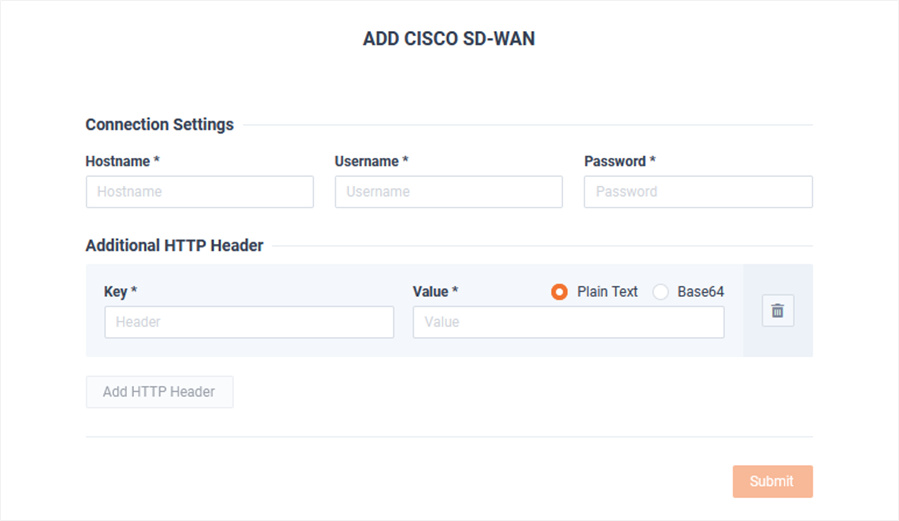
Cisco SD-WAN
The Cisco SD-WAN tab provides integration to Cisco vManage. In Cisco SDWAN environments, LiveNX will poll vManage for SDWAN alerts, configuration and tunnel statistics.
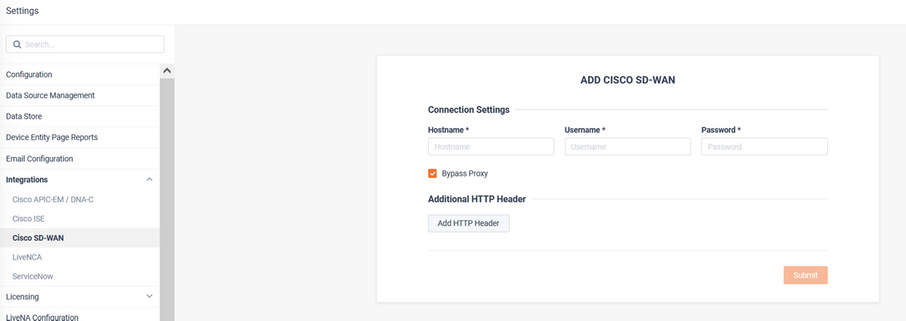
To integrate LiveNX to vManage enter the vManage hostname or IP address, set the username and password, and click .
If required, and a proxy is required to connect to vManage, click and enter the Key and Value. When finished, click .
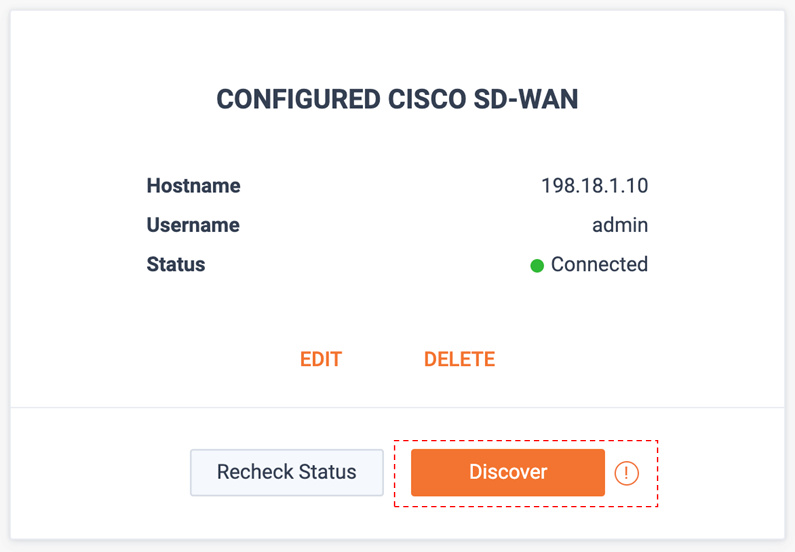
Once LiveNX has established a connection with vManage, the Status shows as Connected.
LiveNX can import cEdge and vEdge router inventory from vManage.
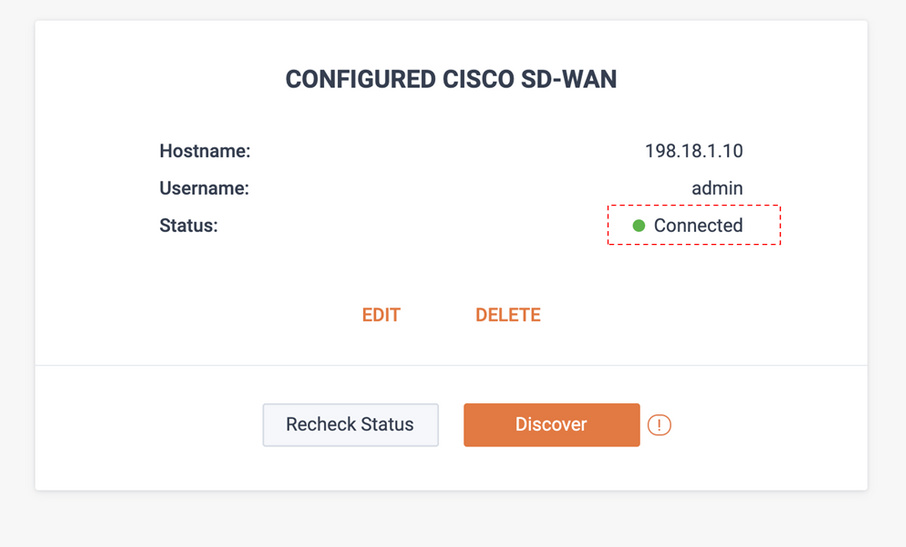
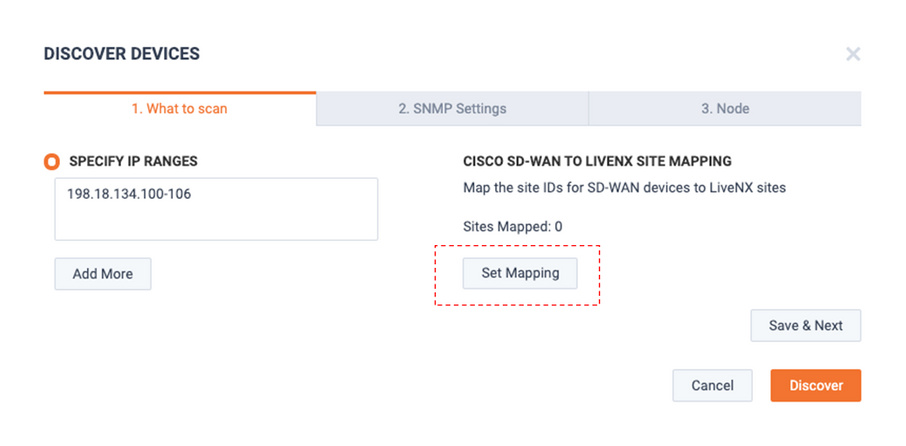
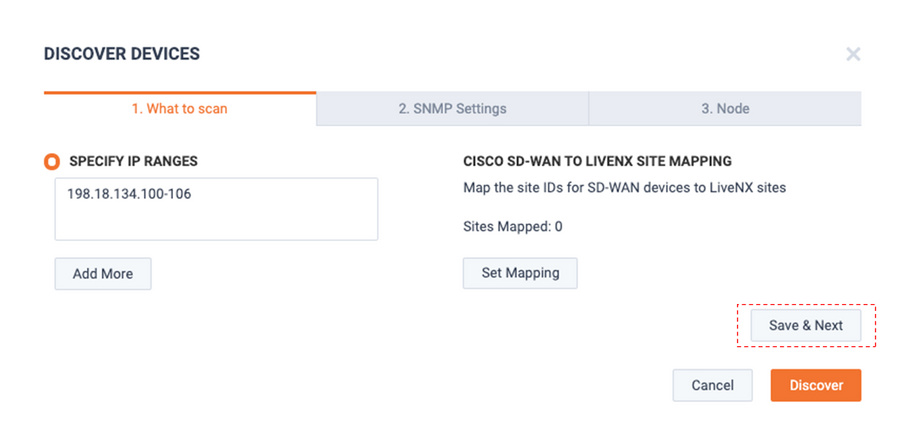
To begin this process, click .
Enter the IP address(es) of interest in the Specify IP Ranges field to define the IP range of SD-WAN devices LiveNX will discover from vManage. These device’s management IPs must have connectivity to LiveNX.
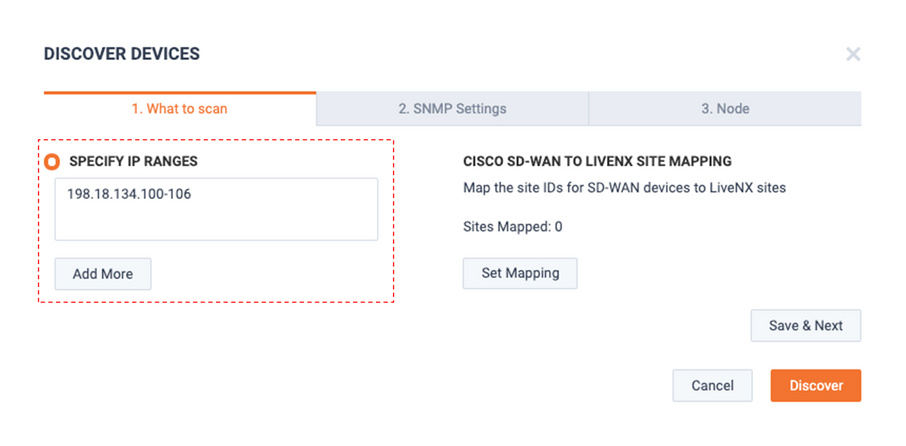
LiveNX Sites and vManage Sites are defined differently. To ensure vManage sites are accurately mapped to LiveNX sites, click .
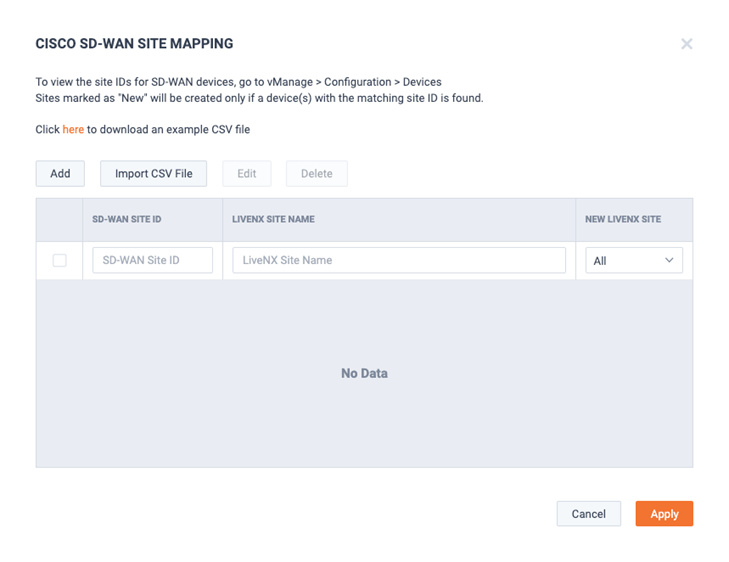
The Cisco SD-WAN Site Mapping modal appears.
To add an individual site, click .
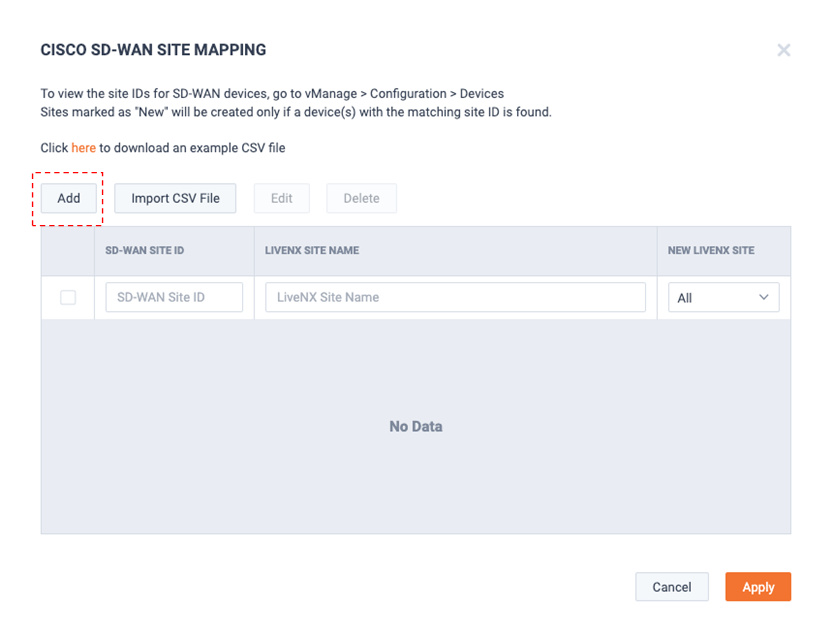
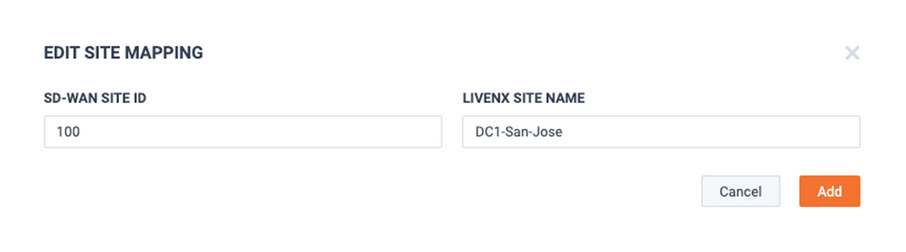
Enter the SD-WAN Site ID and LiveNX Site Name and click .
Repeat for all SD-WAN Site ID’s and LiveNX Site Names to be added into the system.
When done, the site mapping is listed.
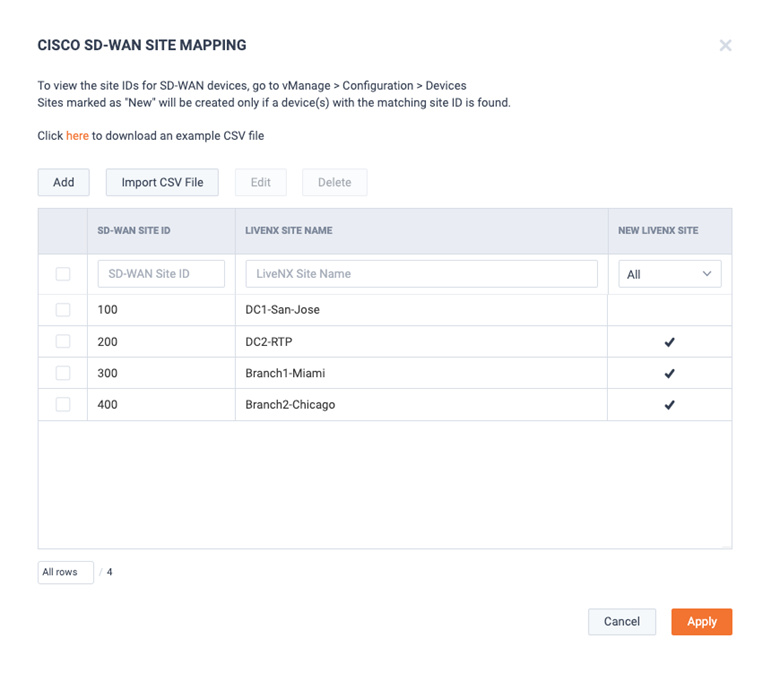
If desired, sites can also be added via CSV file. Click to import a CSV.
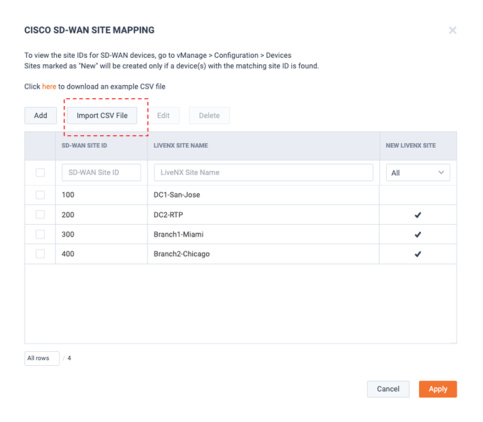
Below is an example CSV.
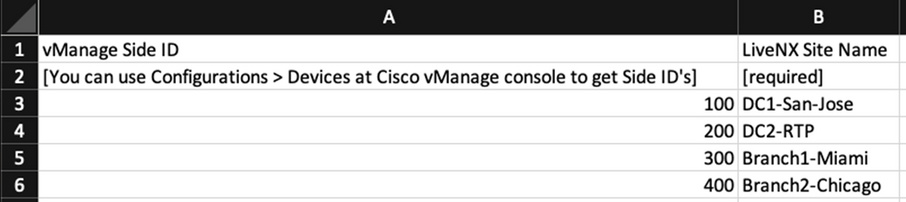
NOTE: The example file also includes the existing LiveNX site(s) already defined in LiveNX. These sites can be associated with Cisco SD-WAN (Viptela) site ID’s.
If there are any invalid entries in the .csv file, the rows will be ignored.
If there are any invalid entries in the .csv file, the rows will be ignored.
When ready, click .
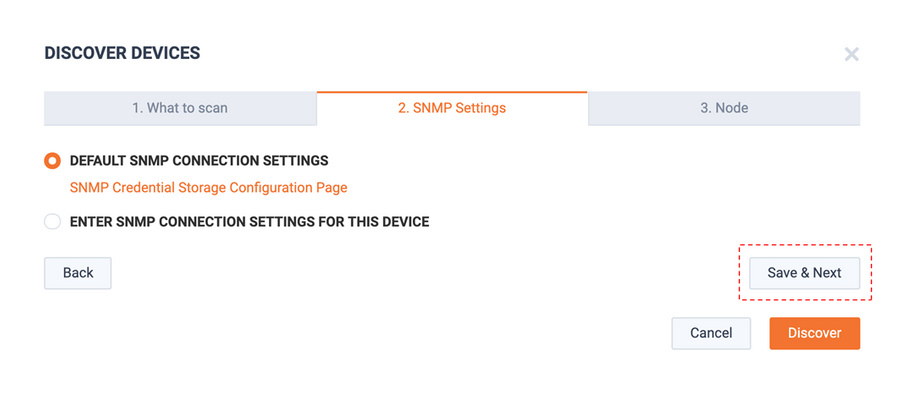
The SNMP Settings tab appears. Select the desired SNMP credentials for LiveNX to monitor these SDWAN devices.
Note: Easy onboarding via API integration to vManage and the SNMP polling of the devices are separate processes. If the SNMP settings are incorrect or if LiveNX does not have connectivity to the devices via SNMP – the devices will show up as gray or unreachable.
When ready, click .
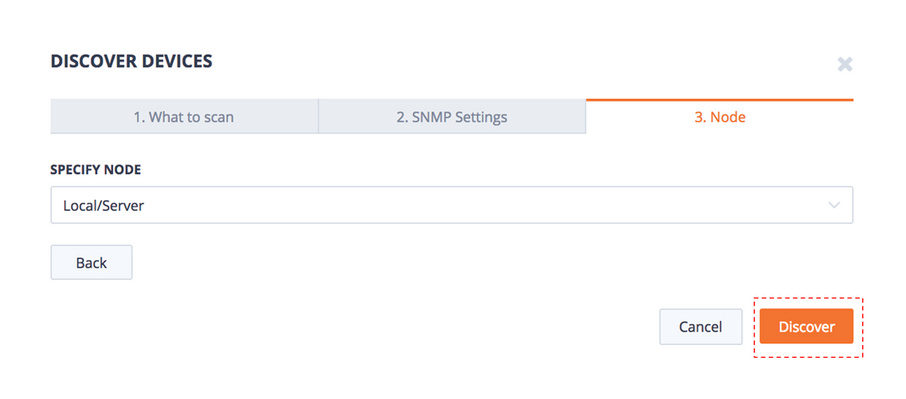
The Node tab appears. From the Specify Node picker, select the LiveNX Node that will monitor these SDWAN devices. When ready, click .
The Device Management page appears and displays the discovery progress log.
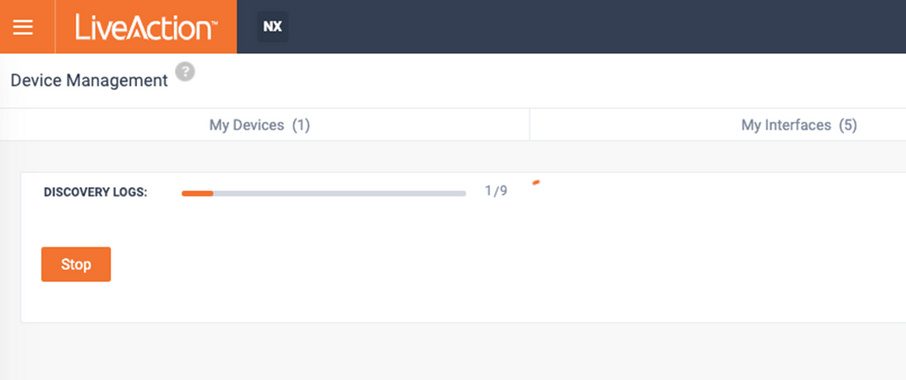
The devices discovered from vManage appears on the LiveNX Discovered Devices tab.

Adding these discovered devices to the LiveNX inventory is now identical to device discovery of any other SNMP monitored device.
If desired, select the devices and click to set or override the device site name, group and polling settings.
If desired, click to define which interfaces LiveNX should monitor on these SDWAN devices. Or, to use the default learned settings, click .